


[ad_1]
Home windows’ built-in Deployment Picture Servicing and Administration command-line software, a.ok.a. DISM, has been round since Home windows Vista, when it was first launched as a way for creating and managing Home windows photographs primarily based on the Home windows picture (.wim) file format. It additionally works with the encrypted and compressed Digital Software program Obtain (.esd) file format launched in Home windows 8.1. DISM hasn’t modified a lot because it emerged in 2014, and (largely) works the identical for each Home windows 10 and 11.
Within the context of the DISM utility’s title, “servicing” is a broad time period overlaying a variety of capabilities, from capturing a disk partition and making a disk picture from its contents to mounting and modifying a disk picture. My very own latest use of DISM with Home windows 10 and 11 has centered round day-to-day system repairs and upkeep. I’ll talk about the next DISM duties on this article:
- Putting in Home windows updates from the Microsoft Replace Catalog or different bundle file sources
- Repairing a Home windows 10 or 11 picture
- Cleansing up the Home windows part retailer to reclaim disk house
- Figuring out Home windows photographs, installers, and ISO information
- Figuring out and altering worldwide settings in Home windows photographs
To make use of DISM for any of those duties, you’ll have to open an administrative command immediate or an administrative PowerShell session. (Kind both cmd or powershell within the Home windows search field, right-click Command Immediate or Home windows PowerShell within the checklist of outcomes, choose Run as administrator, and enter a password if prompted.)
Utilizing DISM to put in Home windows updates
My article about putting in Home windows updates with DISM explains find out how to use the dism /Add-Package deal choice to put in Catalog or different updates in .cab or .msu codecs right into a focused Home windows picture. This process turns out to be useful when Home windows Replace isn’t working correctly or for managing large-scale or distant deployments. Basically, it’s a method so as to add updates to a Home windows picture, a way typically known as “slipstreaming.” Please seek the advice of that story for all the small print.
Repairing a Home windows 10 or 11 picture utilizing DISM
In my article entitled “Find out how to restore Home windows 10 (and 11) in 4 steps,” I element my go-to set of steps for fixing misbehaving Home windows programs. Step 1 offers with utilizing DISM to test and scan the well being of a Home windows picture and restore it to well being utilizing the /checkhealth, /scanhealth, and /restorehealth switches for DISM’s /cleanup-image choice.
Determine 1 reveals some details about these instructions; please learn my Home windows restore story for step-by-step directions and explanations.
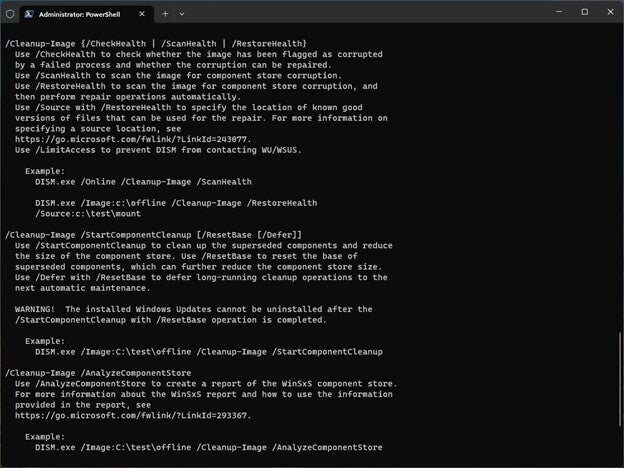 Ed Tittel / IDG
Determine 1: Chosen DISM /on-line /cleanup-image assist choices in Home windows 11. (Click on picture to enlarge it.)
Cleansing up the Home windows part retailer with DISM
The WinSxS folder shops Home windows part retailer information, which assist Home windows updates and customizations. As updates get added to Home windows over time, an entry will get saved within the Home windows part retailer for every such replace along with the elements already current. Which means that a certain quantity of muddle is inevitable, the place new elements reside alongside older ones they could have made out of date.
DISM gives a few methods to take away such muddle. The primary identifies and deletes earlier variations of replace elements from the Home windows part retailer with two instructions:
dism /on-line /cleanup-image /analyzecomponentstore
dism /on-line /cleanup-image /startcomponentcleanup
Determine 2 reveals the entire operation. Observe that I run /analyzecomponentstore as soon as initially to indicate a reclaimable bundle, then run /startcomponentcleanup to do the cleanup, then /analyzecomponentstore once more to indicate no remaining reclaimable packages and the ensuing footprint modifications.
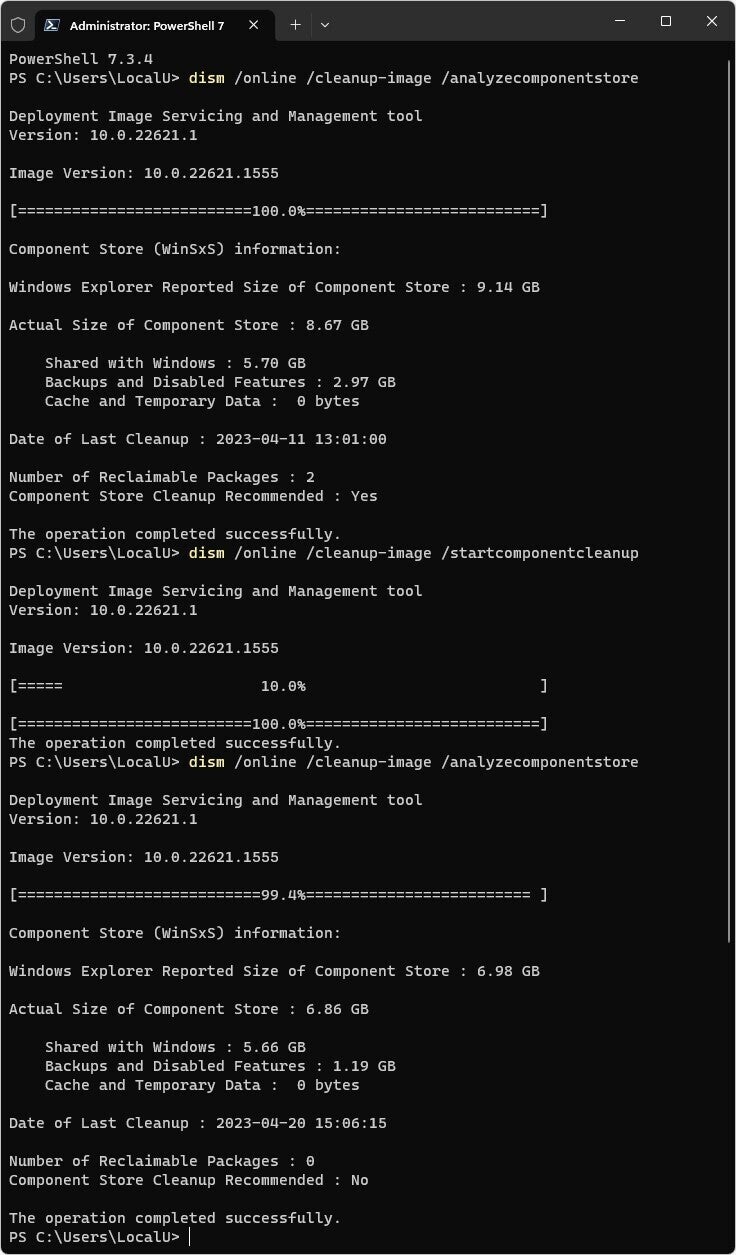 Ed Tittel / IDG
Determine 2: Earlier than and after evaluation reveals reported dimension financial savings of two.16GB and on-disk financial savings of 1.81GB after reclaiming two packages from the part retailer. (Click on picture to enlarge it.)
The instance in Determine 2 solely cleans out two reclaimable packages, however after a Patch Tuesday that features a number of replace components, I’ve seen as many as 5 – 6 reclaimable packages present up when analyzing the part retailer. After working the corresponding clean-up operation, I’ve seen reductions of as much as 6GB of disk house.
I’ve gotten within the behavior of working this operation as soon as a month on my Home windows PCs to maintain the part retailer slimmed down. Financial savings of roughly 2 to 4GB are typical.
There’s one other variation on the identical syntax as proven within the previous instance with an added choice:
dism /on-line /cleanup-image /startcomponentcleanup /resetbase
This removes all outmoded variations of each part within the part retailer. Admins or energy customers in quest of a “deep clear” can use this syntax as a substitute of the previous, easier cleanup as long as they perceive a ensuing potential complication: Current replace packages can not be uninstalled after this command is executed (although new replace installs can proceed as at all times).
In different phrases, don’t elect this feature until you’re keen to freeze the bundle lineup in your Home windows picture going ahead. FWIW, this has by no means triggered me any issues on over 100 PCs I’ve labored with since DISM got here alongside within the Home windows 8 period.
Determine 3 reveals the decidedly modest outcomes that /resetbase delivers on an already clear check machine (0.14GB reported dimension, 0.13GB precise dimension). On a PC with reclaimable packages, it can increase house reclamation by about 10% to twenty%.
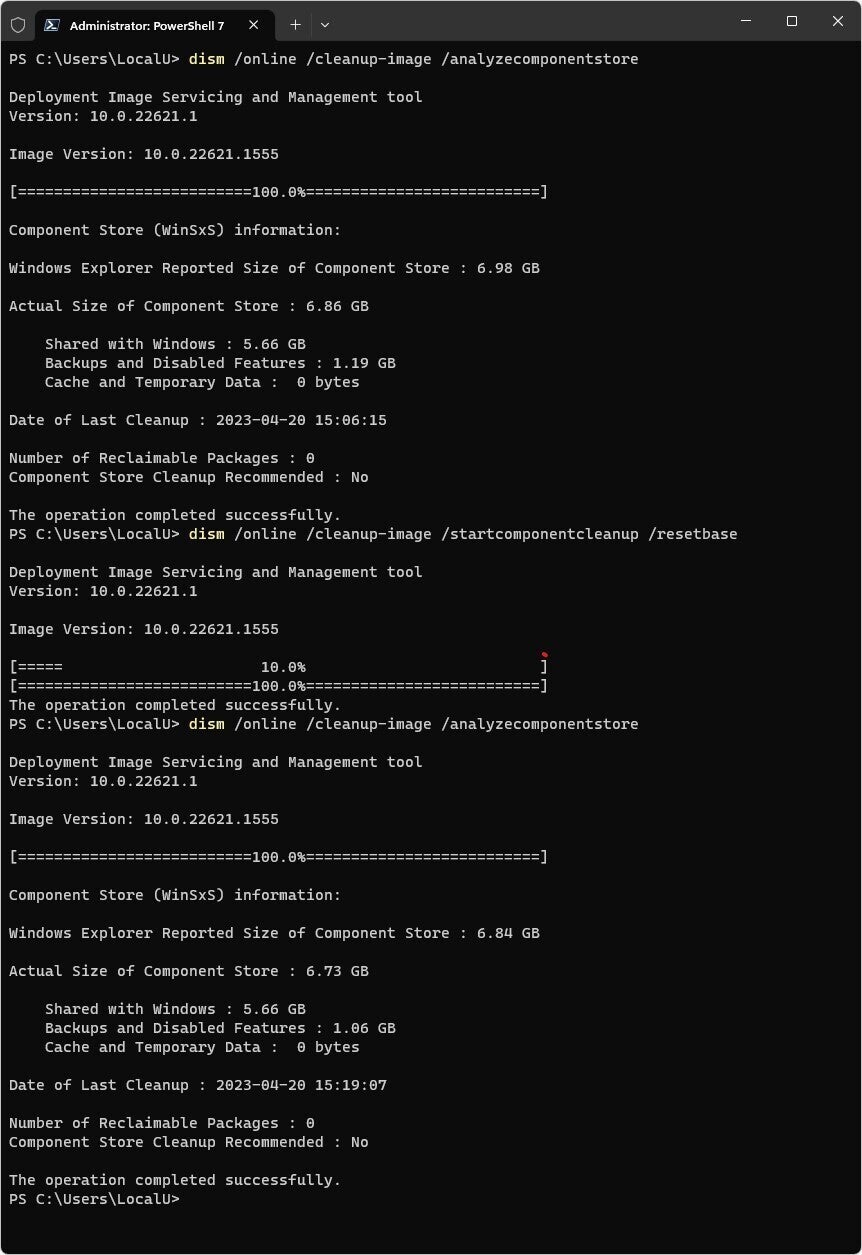 Ed Tittel / IDG
Determine 3: Working /resetbase on an already-clean PC makes little distinction. (Click on picture to enlarge it.)
On standalone PCs, there’s little purpose to make use of DISM’s /resetbase choice. It in all probability makes essentially the most sense for curated photographs destined for deployment.
Microsoft Be taught has extra details about the WinSxS folder and Home windows part retailer.
Figuring out Home windows photographs, installers, and ISO information with DISM
Should you work with a number of variations of Home windows, you could end up taking a look at an installer or OS picture with out having the ability to inform what’s what. Although it received’t work on working Home windows photographs, DISM can inform you a good quantity about WIM and ESD information you may need mendacity round.
Should you run:
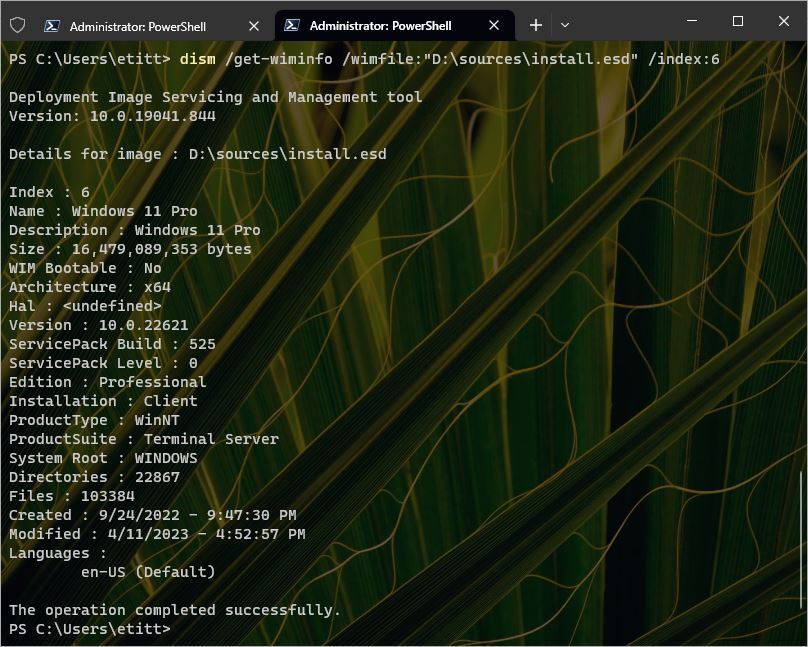
dism /get-wiminfo /wimfile "goal"
the place you utilize a sound path specification for a goal file, it can present you all the varied components listed in that file by quantity. For instance, I used:
dism /get-wiminfo /wimfile:"D:sourcesinstall.esd" /index:6
on a USB flash drive upon which I’d deposited a Home windows 11 installer with out labeling it clearly sufficient. The /index:6 swap specifies the Home windows 11 Professional stuff contained in the set up.esd picture file. Determine 4 reveals the end result.
 Ed Tittel / IDG
Determine 4: Right here’s the data in regards to the Home windows 11 Professional subset throughout the goal set up.esd picture file: model 22621 (22H2) final up to date on 4/11/2023. (Click on picture to enlarge it.)
You need to use DISM’s /get-wiminfo capabilities to find out what model of Home windows the installer is for, and what editions (Dwelling, Professional, and so forth) it consists of. This may be fairly useful for the installer UFDs that the Microsoft Media Creation Software creates. As a result of they’re all named ESD-USB, the added information makes all of the distinction.
Figuring out and altering worldwide settings in Home windows photographs with DISM
Trying on the backside of Determine 4, you’ll be able to see the Home windows Professional picture components use American English (ISO language code en-US). If you wish to restore a Home windows picture utilizing DISM, the supply materials for each restore and the goal photographs should be an identical — identical OS, identical bittedness (x86 or x64), identical default language.
Sooner or later in my checkered profession with Home windows 10 or 11 I apparently downloaded and put in the UK language model (en-GB) on one in every of my PCs, in all probability by an ill-chosen MSDN obtain. As I encountered mysterious issues in getting /restorehealth to work on that machine (which drove me bonkers for some time), it progressively dawned on me that my downside wasn’t a lack of know-how of the DISM command. Moderately, the problem was that I used to be making an attempt to make use of an American English (en-US) picture to restore a British English (en-GB) set up. Doesn’t work, so don’t hassle making an attempt. As an alternative, ensure that restore and goal photographs are the identical OS model, bittedness, and language.
Had I recognized then what I do know now about DISM, I may’ve gotten to the underside of issues a lot sooner. To test the worldwide settings for a Home windows picture, one makes use of the /Get-Intl attribute. For a web based (working) picture, the syntax is:
dism /on-line /Get-Intl
Specifying an offline picture requires utilizing the /Picture attribute, with a path specification to the picture file you want to look at. Determine 5 reveals the /Get-Intl outcomes for a web based picture with en-GB because the default language.
 Ed Tittel / IDG
Determine 5: The /Get-Intl attribute reveals language settings (useful when utilizing languages aside from en-US). (Click on picture to enlarge it.)
I found this discrepancy when putting in an replace to Home windows and observing that the keyboard behaved like a UK mannequin as a substitute of a US mannequin. This led me to alter the fallback language to American English (en-US) and to alter my locale to the USA, after which these issues vanished.
This DISM command helps altering the put in language, however it solely works on an offline picture. To make that change, I would need to boot to a restoration picture, then navigate to the put in picture file on this machine and carry out a sequence of instructions involving /Set-UILang, /Set-UILangFallback, /Set-UserLocale, and /SetInputLocale. See Microsoft Be taught for all these particulars.
Dig deeper into DISM
Though these examples embody a good variety of capabilities in DISM, it is just the start of what you are able to do with this highly effective and succesful software. For example, Microsoft Be taught has tutorials for utilizing DISM to:
The extra you dig into DISM, the extra you may discover to love about it. That is why the DISM Reference at Microsoft Be taught ought to be in your favorites checklist or in your browser bookmarks. You can even discover a lot of nice, step-by-step tutorials on working with DISM at ElevenForum.com, particularly “Restore Home windows Picture Element Retailer in Home windows 11.” (Right here’s the Home windows 10 equal.) Get pleasure from!
This text was initially printed in February 2016 and up to date in June 2023.
Copyright © 2023 IDG Communications, Inc.
[ad_2]
Source link

